Collecting logs from Check Point using fw1-loggrabber
TL;DR
Collecting logs from Check Point firewalls is tricky. Here I managed to use the fw1-loggrabber tool running on a Linux 32bit, grab logs from a Check Point Manager Gaia R77.30, store logs in a file and use logrotate to manage them.
Intro
Check Point is a wonderful product. Until you want to collect logs from it with an external tool. In my case, I need to collect logs to a Linux server so I can do some cool stuff with it. There are a lotofresourcesavailable on how to do this. Good luck with those. None of them helped me to achieve what I did in this post. That is why it is important for you to understand that this guide used Check Point Gaia R77.30. The hardware itself can be anything from a VM to a high end appliance. If you use anything else, it may work. Or it may not.
To collect logs from Check Point, the fw1-loggrabber tool will be used. This is available here. You can also use the version available on sourceforge but this is outdated. You can see work done in the code base of the github version. This tool only runs on Linux x86, so a Linux Ubuntu x86 was installed in the Lab Server running at 172.16.1.10 with kernel 3.16. It also runs on kernel 4. The OPSEC LEA trust must be configured between Check Point Manager and the tool. The compilation of fw1-loggrabber will not work if all the Linux dependencies are not satisfied.
This exercise assumes that a lab environment is already prepared with:
A Check Point Gaia R77.30 Gateway and Management. In my case, it’s a VM running both. This has IP address 172.16.1.1.
A Windows client to run the Check Point SmartDashboard. In my lab this has IP address 172.16.1.11
A Linux x86 client running kernel 3.16 to run the loggrabber tool. This has 172.16.1.10
The process of creating the lab environment is up to you. If you want more information on this, leave a message below.
Configuring Check Point
First we need to configure the Check Point Management server to accept the OPSEC LEA connection. This is how to achieve this.
Log in to SmartDashboard as an admin
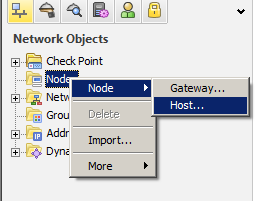
Create a Host object for the Linux server that will collect the logs:
My Linux server is 172.16.1.10:
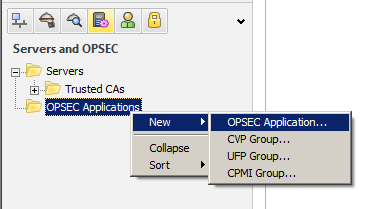
Create the OPSEC object:
Go to the “Servers and OPSEC” tab and right-click on the folder “OPSEC Application”. Create a “New OPSEC Application”:
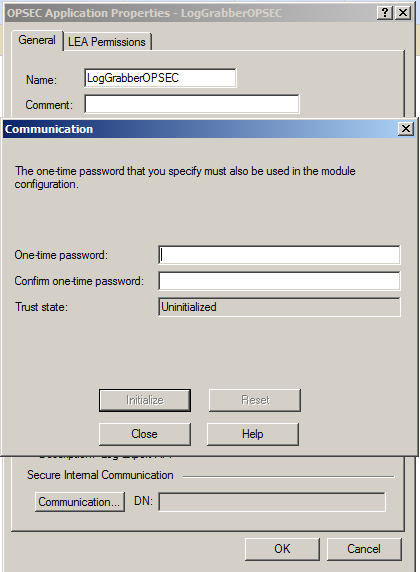
Configure the OPSEC object. Give it a name, select the Host you just created for the Linux server and select the option LEA:
Click on Communication and set up a new SIC one-time password. Bear in mind that once you do this, the access would be already available, no policy pushes required:
You may want to add a rule to allow the OPSEC LEA connection from the linux server to the Check Point gateway using TCP/18184 (FW1_lea)
From 172.16.1.10 to 172.16.1.1 on port TCP/18184
Configuring Linux
I am using a Debian 8.2 in the lab:
The fw1-loggrabber tool needs to be compiled from source. Let’s use linux user user and the tool folder /home/user/fw1-loggrabber.
Before using the tool, the following dependencies must be installed. This will probably tell you to install many more packages but it depends on the Linux server being used:
user@debian:~$ mkdir fw1-loggrabber; cd fw1-loggrabber
user@debian:~/fw1-loggrabber$ git clone https://github.com/certego/fw1-loggrabber
This will make the fw1-loggrabber source code be downloaded under /home/user/fw1-loggrabber/fw1-loggrabber. Once it’s finally installed, all these folders may be cleaned up.
Download the necessary OPSEC development libraries from Check Point here. Upload the file OPSEC_SDK_6.0_Linux.zip to the /home/user/fw1-loggrabber folder and unzip it. This is required to compile fw1-loggrabber.
This zip contains the linux SDK on file OPSEC_SDK_6_0.linux30.tar.gz. This file needs to be unziped in the same folder as fw1-loggrabber with command:
user@debian:~/fw1-loggrabber$ tar zxvf OPSEC_SDK_6_0.linux30.tar.gz
The files are extracted in folder pkg_rel.
Compile fw1-loggrabber. But first, go to /home/user/fw1-loggrabber/fw1-loggrabber and change this line in the Makefile file to the following:
PKG_DIR = ../pkg_rel
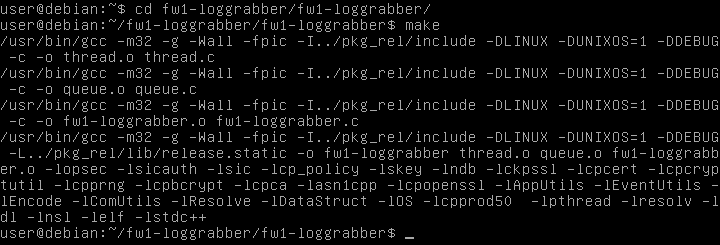
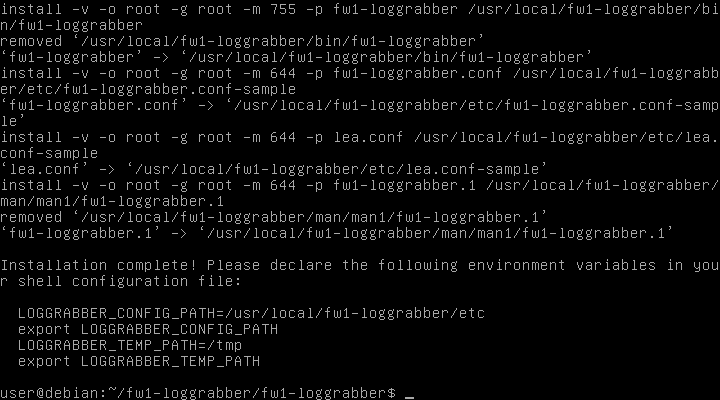
Then finally compile the code and install it so you can use the fw1-loggrabber afterwards:
user@debian:~/fw1-loggrabber/fw1-loggrabber$ make
user@debian:~/fw1-loggrabber/fw1-loggrabber$ sudo make install
The fw1-loggrabber tool is installed under /usr/local/fw1-loggrabber/. When this is done, everything inside /home/user/fw1-loggrabber/ can be deleted with:
user@debian:~/fw1-loggrabber/fw1-loggrabber$ cd
user@debian:~$ rm -rf fw1-loggrabber/*
Download the opsec-tools from here. This tool is used to integrate the Linux server with the Check Point Management server by supplying it the SIC. This tool is already compiled for Linux 32bit. Upload the downloaded file opsec-tools.tar.gz to the home folder /home/user/ and unzip it. This tool can be used again later.
user@debian:~/$ tar zxvf opsec-tools.tar.gz
Integrate the Linux server with the Check Point Manager via OPSEC by running the opsec-tools tool. This generates a TCP connection from the Linux server to the Check Point Manager on port TCP/18210 (FW1-ica-pull). For this, we will need the following:
The IP address of the Check Point Manager = 172.16.1.1. This goes in option -h
The OPSEC object name that was created = LogGrabberOPSEC. This goes in option -n
The password that was set for the communication (SIC). This goes in option -p
The output of this command gives us two fundamental pieces of information:
The opsec.p12 file: it’s the certificate used for communication between the two servers
The Common Name (CN) of the certificate that is required by fw1-loggrabber. In this case, it is CN=LogGrabberOPSEC,O=gw..n7symj. Now we have everything required to use the fw1-loggrabber tool.
Copy the opsec.p12 file to the fw1-loggrabber working directory:
Change the parameters inside the lea.conf file to what we grabbed before:
lea_server ip is the IP of the Check Point Manager: 172.16.1.1
opsec_sic_name is the CN of the certificate that has been downloaded by the opsec-tool: CN=LogGrabberOPSEC,O=gw..n7symj
opsec_sslca_file is the path to the opsec.p12 file downloaded by the opsec-tool: /home/user/fw1-loggrabber/opsec.p12
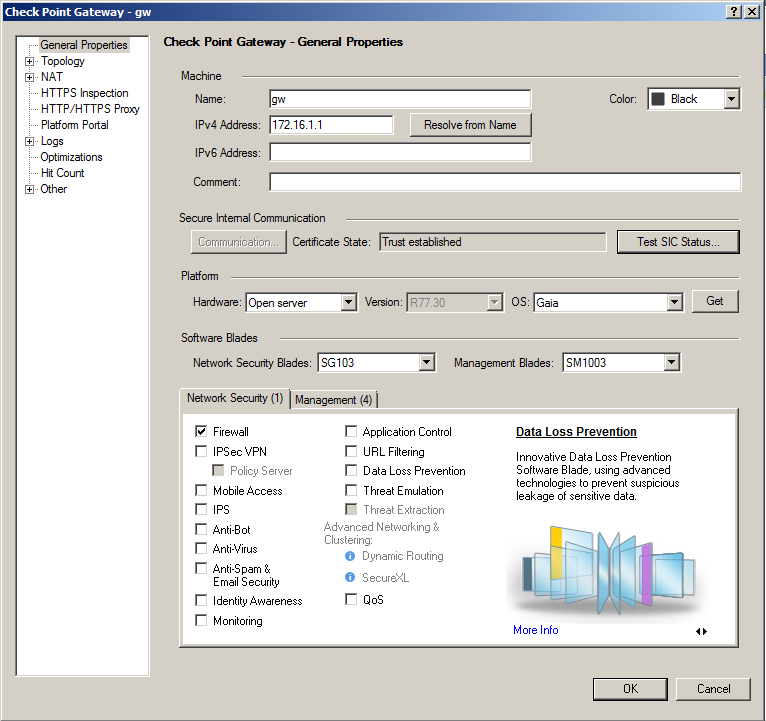
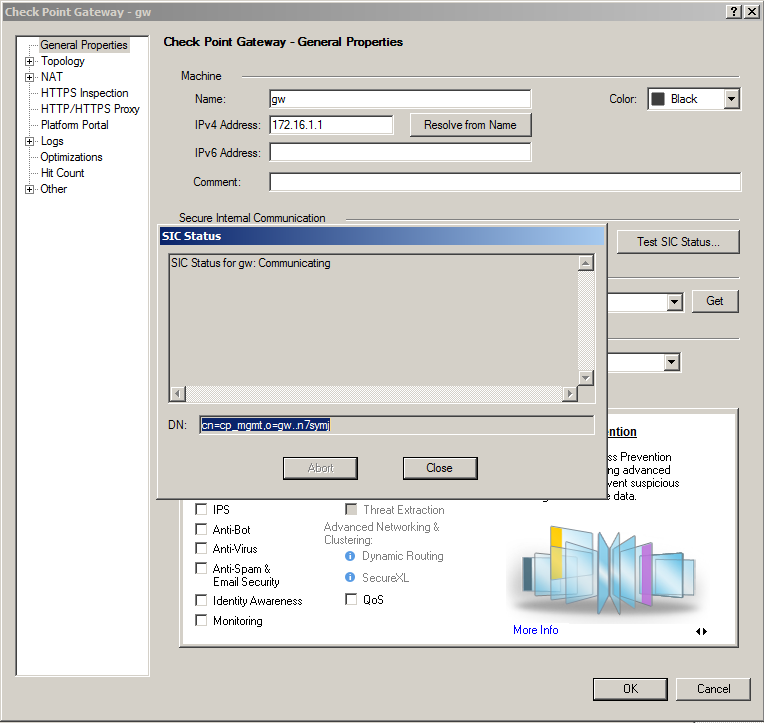
lea_server opsec_entity_sic_name is the Distinguished Name (DN) for the Check Point Manager certificate. This can be grabbed by going to Check Point SmartDashboard and editing the Check Point Manager object and clicking on Test SIC Status:
The DN can be found where it is highlighted below:
In this case, it is cn=cp_mgmt,o=gw..n7symj. Finally, the lea.conf file has the following content:
It’s time to finally configure the fw1-loggrabber tool and supply the OPSEC LEA parameters. For simplicity, I use the default configuration file for fw1-loggrabber available in /usr/local/fw1-loggrabber/etc/. Copy the configuration file to the working directory:
Run the tool. Notice that with this configuration file the output file will be saved at fw1-lograbber.conf. If the tool runs correctly, the logs will be collected from the Check Point Manager indefinitely. Do yourself a favor and add the fw1-loggrabber executable to your PATH environment variable:
Depending on your Check Point installation, the log volume can be humongous. I don’t really want to have gigabytes of logs in one file. Logrotate is your friend.
/home/user/fw1-loggrabber/fw1-loggrabber.log{
   size 100M
   compress
   compresscmd /usr/bin/xz
   compressext .xz
   rotate 1
   copytruncate
   nocreate
   su user user
   missingok
   notifempty
}
With logrotate’s lastaction directive, you can do nice things to your log file, like stashing it for offline backup or anything else, let’s say, send to your AWS bucket.
Extra configuration parameters
You will quickly realize that the log file is poluted by repetitive and useless fields. I added the following line to the configuration file to remove annoying fields. Bear in mind these fields are not documented anywhere. Please let me know if they are.